Technical Newsletter vol.17 : Measurement technology supporting µ-MIM technology
Measurement technology supporting µ-MIM technology
MIM parts manufactured by our µ-MIM technology are small and complex shapes so the measurement technology is a key technologies which support the quality of µ-MIM product. In this issue, we introduce the quality assurance measurement of small module gears and non-standard gears that any standard exist.
Contact and non-contact measuring machines
We employ contact and non-contact type 3D measurement machine as quality assurance evaluation. The number of products that do not allow probes of contact type measurement machine to enter, such as small module gears and internal gears, is continuously increasing. Therefore, the measurement ratio by the non-contact type measuring machine is also increasing. We introduce the non-contact measuring machines; an optical non-contact 3D measuring machine and X-ray CT scanner.
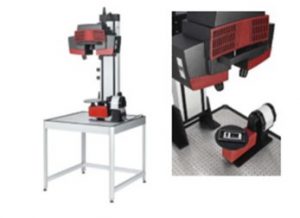
Optical non-contact 3D measuring machine

Cr. Photo : https://www.marubeni-sys.com/3dscanner/3ds/atosts.html
It has been almost 10 years since the company introduced an optical non-contact 3D measuring machine ATOS triple scan by GOM. At that time, we purchased shortly after it was released in the market assuming that it could capture the highest resolution of any optical measuring machines. This is a type of dimension measuring machine that can measure very small objects with the highest resolution even present time.
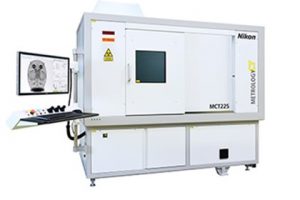
X-ray CT measuring machine

Cr. Photo : http://www.nikon-instruments.jp/jpn/industrial-products/xray-ct-inspection/ct/mct225
Nikon’s MCT225 CT scanner is utilized in our evaluation. Unlike an optical measuring machine, there is no influence from surface reflection. Therefore, pretreatment such as surface coating is not required. In addition, it can be used to measure internal gears because it is possible to obtain non-destructive numerical data on the internal structure from the characteristics of X-ray.
Measurement in µ-MIM technology
High resolution measuring machine is necessary for quality assurance evaluation for our Micro metal injection molding (µ-MIM) parts. However, the technologies, the experiences to analyse the data and the pre-processing treatment of specimen are more indispensable.
In addition to those technologies and experiences we have cultivated analysis technology of the tooth surfaces. It is comparing the analysis data obtained from X-ray CT scanner and optical measurement with 3D model data. We provide our Micro metal injection molding (µ-MIM) products to customers with the results of this uniquely developed analysis technology. We also conduct analysis services of the parts that are not our products.
COLUMN

Hello. I am Tomori Shimada is in charge of the sintering process. It has been over 1 year since I joined the company. My motto is to keep smiling and I smile a lot while working. I will gradually deepen my knowledge about the sintering furnace which I contact everyday. My hobbies are biking. Last week, I had a chance to participate in bicycle racing in a track bank. When I bike at the bicycle racing, I always perform a 1km time trial but I was able to reduce the time by 2 seconds to 1 minute and 26 seconds.
